NovaX is more than just a toolkit—it's your bridge to the dynamic world of MultiversX blockchain. Crafted with precision in Rust, NovaX ensures you get a seamless, efficient, and type-safe experience when interacting with blockchain components.
In this guide, we'll embark on a journey to unlock the full potential of NovaX. From querying to calling, from deploying contracts to fine-tuning the user experience, we've got it all covered. Whether you're new to NovaX or looking to master its advanced features, this tutorial will provide you with the insights and hands-on techniques you need.
Throughout this cookbook, we'll utilize examples based on the xExchange ABIs. These ABIs serve as practical references to demonstrate NovaX's powerful features in real-world scenarios. You can access and download the xExchange ABIs from the following link: xExchange Pair ABI.
Get ready to elevate your blockchain development experience with NovaX!
Warning: NovaX extensively uses the async/await paradigm, which requires an asynchronous runtime. NovaX specifically relies on the Tokio runtime. Ensure you have Tokio as a dependency in your project for NovaX to function correctly.
Setting Up NovaX: A Simple 4-Step Process
Integrating NovaX into your Rust environment is straightforward. Just follow this four-step process:
-
Adding the NovaX Crate to Your Project: Start by including the "novax" crate in your
Cargo.toml. Ensure you're referencing the correct version (0.0.22 for this guide).[dependencies] novax = "0.0.22" -
Setting Up Your ABIs: For NovaX to function properly, you need to organize your ABIs in a specific structure. Here's a simple representation of how your directory should look:
.
├── .novax
│   └── abis
│       ├── my_first_abi.abi.json
│       └── my_second_abi.abi.json
├── src
├── Cargo.toml
└── ... other project files and directories ...
Create a folder named
.novaxat the root of your project. Inside it, establish a mandatory sub-directory named "abis" where you'll place all your ABI files, likemy_first_abi.jsonandmy_second_abi.json. -
Directing NovaX to Your ABIs: To help NovaX locate your
.novaxdirectory, set theNOVAX_PATHenvironment variable. The recommended way is by adjusting the Cargo configuration. Navigate to.cargo/config.tomlat the root of your project and input:[env] NOVAX_PATH={ value = ".novax", relative = true } -
Test Your Setup: Now that you've configured everything, let's ensure the setup is working correctly. Build your project by running the following command:
cargo buildIf everything is set up correctly, the command should run without any errors.
Validating NovaX Setup
Verifying Struct Generation
To ensure NovaX has been configured correctly, the most straightforward method is to put it to the test.
Suppose you've placed the pair.abi.json from xExchange inside the .novax/abis directory. On executing the cargo build command, NovaX will generate a PairContract struct that corresponds to the xExchange's pair contract.
Here's a simple validation procedure:
- In any Rust file, like
lib.rs,main.rs, etc., add the following code snippet:
extern crate novax;
use novax::pair::pair::PairContract;

async fn hello() {
   let _pair_contract = PairContract::new("");
}- Now, try to compile the code.
If the code compiles without any errors, congratulations! It signifies that NovaX has been successfully set up in your project.
Note: Do not attempt to run the code, as it will lead to an error. The purpose of this snippet is solely to check its compilation.
Testing Autocompletion
Autocompletion is a handy feature that boosts your productivity by suggesting relevant code snippets as you type. Let's ensure this is working for the generated structures.
-
Autocompletion Test: After the successful setup in the previous step, along with the
PairContract, aPairContractQuerystruct should also be generated. Start typingPairContrin your Rust file. Your IDE should offer autocompletion, suggesting thePairContractQuery: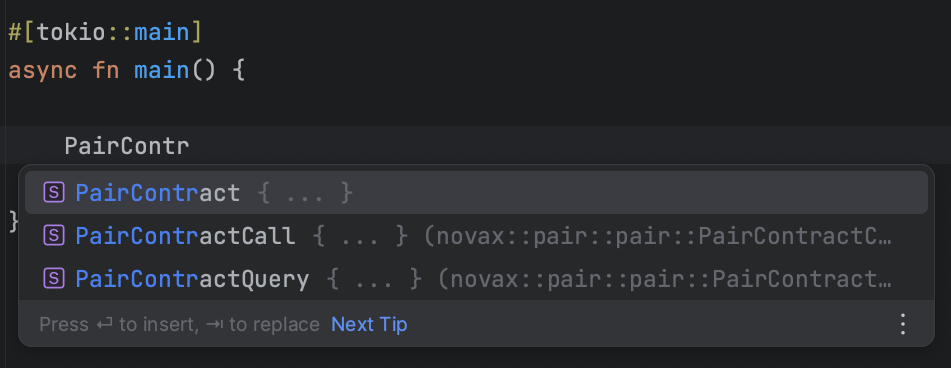
If you witness the autocompletion in action, then everything's set! You can proceed to the next chapter.
However, if the autocompletion is missing:
-
Clear Cargo Cache: Execute
cargo cleanin your terminal to remove the cached files. -
Rebuild Project: Run
cargo buildto rebuild the project. -
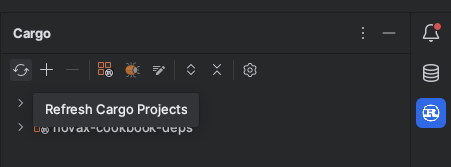
Re-index your project: This step often fixes autocompletion issues. While it isn't always necessary in VSCode, it's sometimes required in JetBrains IDEs like IntelliJ or CLion. Open the cargo panel on the right and click on the refresh button.
Queries
Querying Without Parameters
Imagine you have the xExchange's Pair contract ABI, and you wish to fetch the identifier of the first token in the pair. Thanks to NovaX, you don't have to stress over manual implementations. Based on the provided ABI, NovaX auto-generates utility methods, one of which is get_first_token_id, tailored for this exact purpose.
Below is a concise example showcasing how to harness this auto-generated method:
extern crate tokio;
extern crate novax;

use novax::pair::pair::PairContract;

#[tokio::main]
async fn main() {
    // Initializing the PairContract with its address
    let pair_contract = PairContract::new("erd1qqqqqqqqqqqqqpgqeel2kumf0r8ffyhth7pqdujjat9nx0862jpsg2pqaq");

    // Executing the query to get the first token's ID
    let result = pair_contract
        .query("https://gateway.multiversx.com")
        .get_first_token_id()
        .await
        .expect("Failed to fetch the token ID");

    // Displaying the result
    println!("{}", result);
}
Upon executing the above code, your console should promptly display "WEGLD-bd4d79". Voilà! You've successfully fetched the identifier of the first token in the pair using NovaX.
Note: The method
get_first_token_idcorresponds to the viewgetFirstTokenIdin the contract. NovaX automatically adheres to Rust's naming conventions by converting endpoint and view names into snake_case.
Querying With Parameters
NovaX generates parameters based on Rust's common types, relieving you from wrestling with the intricacies of various contract types. Before diving into the example, ensure you have added the num-bigint crate to your dependencies in Cargo.toml:
num-bigint = "0.4.4"
Suppose you want to estimate a swap result (an amount of USDC) through the "getAmountOut" endpoint, with an input of 1 WEGLD:
extern crate tokio;
extern crate num_bigint;
extern crate novax;

use novax::pair::pair::PairContract;
use num_bigint::BigUint;

#[tokio::main]
async fn main() {
    let pair_contract = PairContract::new("erd1qqqqqqqqqqqqqpgqeel2kumf0r8ffyhth7pqdujjat9nx0862jpsg2pqaq");

    let result = pair_contract
        .query("https://gateway.multiversx.com")
        .get_amount_out(
            &"WEGLD-bd4d79".to_string(),
            &BigUint::from(10u8).pow(18)
        )
        .await
        .expect("Failed to fetch the swap estimate.");

    println!("{}", result);
}
Reminder: The WEGLD amount is expressed in terms of 10^18, mainly because WEGLD has 18 decimals. When you run the code, expect to see an amount of USDC represented in the form of 10^6 since USDC has 6 decimals.
Efficient Caching with NovaX
NovaX comes equipped with built-in capabilities for efficient caching. In this chapter, we'll explore the different caching features NovaX provides.
Before diving in, ensure you've added the novax-caching crate to your Cargo.toml:
novax-caching = "0.0.22"
Note: novax-caching is an extension of NovaX that provides common and tested caching strategies.
Caching With Duration
novax-caching provides a struct CachingLocal that represents in-memory caching. This is the most basic type of caching where all data is stored in memory. It offers speed but does not persist after the program is shut down.
Let's integrate in-memory caching into the previous example, where we fetched the first token identifier of the xExchange's Pair contract:
extern crate tokio;
extern crate novax;
extern crate novax_caching;

use novax::pair::pair::PairContract;
use crate::novax::caching::CachingStrategy;
use novax_caching::local::caching_local::CachingLocal;

#[tokio::main]
async fn main() {
    let caching = CachingLocal::empty();
    let pair_contract = PairContract::new("erd1qqqqqqqqqqqqqpgqeel2kumf0r8ffyhth7pqdujjat9nx0862jpsg2pqaq");

    let first_result = pair_contract.clone()
        .query("https://gateway.multiversx.com")
        .with_caching_strategy(&caching.with_duration(60 * 60 * 24))
        .get_first_token_id()
        .await
        .expect("Failed to fetch the token ID");

    let second_result = pair_contract
        .query("https://gateway.multiversx.com")
        .with_caching_strategy(&caching.with_duration(60 * 60 * 24))
        .get_first_token_id()
        .await
        .expect("Failed to fetch the token ID");

    println!("{}, {}", first_result, second_result);
}
The with_caching_strategy method indicates: "If the result exists in the provided cache, use it. Otherwise, fetch the data from the blockchain and store it in the cache." In this example, the token identifier is fetched only for first_result. The second_result retrieves data from the cache, saving you an additional request!
Note: The
with_caching_strategymethod can accept any struct implementing theCachingStrategytrait, offering a flexible approach to integrate diverse caching mechanisms.
Important: CachingLocal utilizes a HashMap wrapped in an Arc. When you clone a CachingLocal, the cloned version still modifies the same HashMap. Thus, the following code, which uses a cloned cache, behaves identically to the one above:
extern crate tokio;
extern crate novax;
extern crate novax_caching;

use novax::pair::pair::PairContract;
use crate::novax::caching::CachingStrategy;
use novax_caching::local::caching_local::CachingLocal;

#[tokio::main]
async fn main() {
    let caching = CachingLocal::empty();
    let cloned_caching = caching.clone();

    let pair_contract = PairContract::new("erd1qqqqqqqqqqqqqpgqeel2kumf0r8ffyhth7pqdujjat9nx0862jpsg2pqaq");

    let first_result = pair_contract.clone()
        .query("https://gateway.multiversx.com")
        .with_caching_strategy(&cloned_caching.with_duration(60 * 60 * 24))
        .get_first_token_id()
        .await
        .expect("Failed to fetch the token ID");

    let second_result = pair_contract
        .query("https://gateway.multiversx.com")
        .with_caching_strategy(&caching.with_duration(60 * 60 * 24))
        .get_first_token_id()
        .await
        .expect("Failed to fetch the token ID");

    println!("{}, {}", first_result, second_result);
}
Note on Versatility: NovaX is designed with intelligence at its core. You can utilize a single caching variable for all your app's queries, regardless of their differences. NovaX discerns whether two queries are identical by assessing the contract address, the view/endpoint name, and the arguments provided. This means less manual cache management on your end and more efficient querying out of the box.
Cache Until the Next Block
In the blockchain world, executing the same query within a single block will invariably yield the same result. Recognizing this invariant, NovaX provides a caching mechanism that retains the result only until the current block concludes. This strategy is particularly effective for queries whose outcomes might differ with every new block, such as swap estimations.
extern crate tokio;
extern crate num_bigint;
extern crate novax;
extern crate novax_caching;

use novax::pair::pair::PairContract;
use num_bigint::BigUint;
use crate::novax::caching::CachingStrategy;
use novax_caching::local::caching_local::CachingLocal;

#[tokio::main]
async fn main() {
    let caching = CachingLocal::empty();

    let pair_contract = PairContract::new("erd1qqqqqqqqqqqqqpgqeel2kumf0r8ffyhth7pqdujjat9nx0862jpsg2pqaq");

    let result = pair_contract
        .query("https://gateway.multiversx.com")
        .with_caching_strategy(&caching.until_next_block())
        .get_amount_out(
            &"WEGLD-bd4d79".to_string(),
            &BigUint::from(10u8).pow(18)
        )
        .await
        .expect("Failed to fetch the swap estimate.");

    println!("{}", result);
}
After familiarizing yourself with this chapter, you should be well-equipped to code highly efficient programs. But if you're seeking even more proficiency, stay tuned: the next chapter delves into advanced caching techniques.
Advanced Caching Strategies
While the foundational caching strategies provided by NovaX are suitable for most applications, there are times when developers may face unique challenges that require a bit more sophistication. This chapter dives into some of the more intricate caching techniques available in the novax-caching crate.
CachingLocked
Basic caching strategies aim to prevent repeated requests for the same data. But how do they behave under concurrent scenarios, especially when multiple tasks are trying to fetch the same data simultaneously?
Consider the following example:
extern crate tokio;
extern crate novax;
extern crate novax_caching;

use novax::pair::pair::PairContract;
use crate::novax::caching::CachingStrategy;
use novax_caching::local::caching_local::CachingLocal;

use tokio::join;

#[tokio::main]
async fn main() {
let caching = CachingLocal::empty();

    let (first_result, second_result) = join!(
        fetch_pair_first_token_id(caching.with_duration(60)),
        fetch_pair_first_token_id(caching.with_duration(60))
    );

    println!("{}, {}", first_result, second_result);
}

async fn fetch_pair_first_token_id<C: CachingStrategy>(
caching: C
) -> String {
let pair_contract = PairContract::new("erd1qqqqqqqqqqqqqpgqeel2kumf0r8ffyhth7pqdujjat9nx0862jpsg2pqaq");

    pair_contract
        .query("https://gateway.multiversx.com")
        .with_caching_strategy(&caching)
        .get_first_token_id()
        .await
        .unwrap()
}
Now, you might anticipate that because we're using caching, one of the fetch_pair_first_token_id calls will populate the cache, and the other will then retrieve the data from it. However, here lies the nuance: the join! macro triggers both asynchronous functions to run concurrently. This means that second_result might begin its request even before the first_result has had a chance to populate the cache.
So, in this concurrent scenario, we're not really benefiting from our caching mechanism because both tasks might end up making separate requests to fetch the data before it's stored in the cache.
To enhance concurrency and push your code's efficiency to the extreme, employ the CachingLocked wrapper around your caching strategy. Here's how:
extern crate tokio;
extern crate novax;
extern crate novax_caching;

use novax::pair::pair::PairContract;
use crate::novax::caching::CachingStrategy;
use novax_caching::local::caching_local::CachingLocal;

use tokio::join;
use novax_caching::locked::caching::CachingLocked;

#[tokio::main]
async fn main() {
    let caching = CachingLocked::new(CachingLocal::empty());

    let (first_result, second_result) = join!(
        fetch_pair_first_token_id(caching.with_duration(60)),
        fetch_pair_first_token_id(caching.with_duration(60))
    );

    println!("{}, {}", first_result, second_result);
}

async fn fetch_pair_first_token_id<C: CachingStrategy>(
    caching: C
) -> String {
    // no change to the implementation
    "".to_string()
}
By making this slight adjustment, one of the two concurrent requests is guaranteed to retrieve data from the cache.
Note 1: You can wrap any struct that implements the
CachingStrategytrait withCachingLocked. Note 2: Cloning aCachingLockedeffectively clones the underlyingCachingStrategy.
CachingMulti
Suppose you aim to utilize multiple caching mechanisms simultaneously, such as In-Memory and Redis caching. CachingMulti is your go-to utility. This wrapper allows seamless integration of multiple caching strategies.
In the following example, we hypothesize that the novax-caching crate offers a CachingRedis struct. As of this writing, this feature is not available, but it's on the horizon.
extern crate tokio;
extern crate novax;
extern crate novax_caching;
extern crate async_trait;
extern crate serde;

use crate::novax::caching::CachingStrategy;
use novax_caching::local::caching_local::CachingLocal;
use async_trait::async_trait;
use novax::errors::NovaXError;
use std::future::Future;
use serde::Serialize;
use serde::Deserialize;

#[derive(Serialize, Deserialize, Clone, Debug)]
struct CachingRedis;

impl CachingRedis {
    pub fn new() -> Self {
        CachingRedis
    }
}

#[async_trait]
impl CachingStrategy for CachingRedis {
    async fn get_cache<T: serde::ser::Serialize + serde::de::DeserializeOwned + Send + Sync>(&self, key: u64) -> Result<Option<T>, NovaXError> {
        todo!()
    }

    async fn set_cache<T: serde::ser::Serialize + serde::de::DeserializeOwned + Send + Sync>(&self, key: u64, value: &T) -> Result<(), NovaXError> {
        todo!()
    }

    async fn get_or_set_cache<T, FutureGetter, Error>(&self, key: u64, getter: FutureGetter) -> Result<T, Error> where T: serde::ser::Serialize + serde::de::DeserializeOwned + Send + Sync, FutureGetter: Future<Output=Result<T, Error>> + Send, Error: From<NovaXError> {
        todo!()
    }

    fn with_duration(&self, duration: u64) -> Self {
        todo!()
    }

    fn until_next_block(&self) -> Self {
        todo!()
    }
}

use novax_caching::multi::caching::CachingMulti;

#[tokio::main]
async fn main() {
    let in_memory = CachingLocal::empty();
    let redis = CachingRedis::new();
    let caching = CachingMulti::new(in_memory, redis);

    // Proceed with your caching operations
}
The sequence in which caching mechanisms are wrapped in CachingMulti is crucial:
- If the first caching strategy already holds the requested data, the subsequent ones are bypassed.
- When data from a request is returned, it's stored across all specified caching strategies.
Note 1: Cloning a
CachingMultiresults in cloning all its underlying caching strategies.
Note 2: The versatility of
CachingMultilies in its ability to encapsulate any type implementing theCachingStrategytrait. Given thatCachingMultiitself adheres to theCachingStrategytrait, it permits nesting—meaning one can encapsulate multipleCachingMultiinstances, thus integrating three, four, or even more caching strategies.
Warning: As data is simultaneously set across all caching strategies, the efficiency of
CachingMulticorresponds to the least efficient among its underlying strategies.
Calls
If you've gone through the Basic Queries, then diving into contract calls with NovaX should be a cinch.
Note: For this chapter, we'll be working on the devnet. This means the gateway and contract addresses might differ from previous chapters.
Instantiate A Wallet
NovaX builds upon the official MultiversX's SDK. This means that only wallets compatible with the MultiversX's SDK can be used with NovaX. If you're working with a .pem wallet file, here's how you can bring it to life in NovaX:
extern crate novax;

use novax::Wallet;
use novax::executor::NetworkExecutor;

let wallet = Wallet::from_pem_file("<path to your .pem file>").expect("Failed to load the wallet.");
let executor = NetworkExecutor::new(
    "https://devnet-gateway.multiversx.com",
    &wallet
);
Calling The Contract
Fancy a token swap? We'll be calling upon the swapTokensFixedOutput endpoint of the xExchange's Pair contract. The coding pattern is quite akin to a query:
extern crate tokio;
extern crate novax;
extern crate num_bigint;

use novax::pair::pair::PairContract;
use num_bigint::BigUint;
use std::ops::Mul;
use novax::transaction::TokenTransfer;
use novax::executor::NetworkExecutor;
use novax::Wallet;

#[tokio::main]
async fn main() {
    let wallet = Wallet::from_pem_file("<path to your .pem file>").unwrap();
    let executor = NetworkExecutor::new(
        "https://devnet-gateway.multiversx.com",
        &wallet
    );

    let pair_contract = PairContract::new("erd1qqqqqqqqqqqqqpgqq67uv84ma3cekpa55l4l68ajzhq8qm3u0n4s20ecvx");

    let result_tokens = pair_contract
        .call(executor, 600_000_000) // gas limit, set to the maximum
        .with_esdt_transfers(&vec![
            TokenTransfer {
                identifier: "WEGLD-d7c6bb".to_string(),
                nonce: 0,
                amount: BigUint::from(10u8).pow(18) // 1 WEGLD
            }
        ])
        .swap_tokens_fixed_output(
            &"USDC-8d4068".to_string(), // token out
            &BigUint::from(10u8).pow(6).mul(24u8) // slippage, seeking at least 24 USDC
        )
        .await
        .expect("Failed to execute the swap.")
        .result
        .expect("No result from the swap.");

    println!(r#"
    Swap success! Received tokens:

    - {} of {},
    - {} of {}
    "#,
        result_tokens.0.amount,
        result_tokens.0.token_identifier,
        result_tokens.1.amount,
        result_tokens.1.token_identifier
    );
}
And with that, we've seamlessly executed a contract call using NovaX!
Deploys
Deploying contracts using NovaX is a straightforward process, bearing similarities to contract calls. NovaX auto-generates a "deploy" method from the ABI. This method not only takes in the required inputs but also deployment details such as the WASM binary and metadata attributes (such as readability and upgradeability).
Creating A Wallet
The procedure here mirrors the one in the Basic Calls chapter:
extern crate novax;

use novax::Wallet;
use novax::executor::NetworkExecutor;

let wallet = Wallet::from_pem_file("<path to your .pem file>").expect("Failed to load the wallet.");
let executor = NetworkExecutor::new(
    "https://devnet-gateway.multiversx.com",
    &wallet
);
Performing The Deployment
Carrying out the deployment simply entails invoking the deploy method with the necessary parameters:
extern crate tokio;
extern crate novax;

use novax::pair::pair::PairContract;
use novax::executor::NetworkExecutor;
use novax::Wallet;
use novax::CodeMetadata;
use novax::code::DeployData;

#[tokio::main]
async fn main() {
    let wallet = Wallet::from_pem_file("<path to your .pem file>").unwrap();
    let mut executor = NetworkExecutor::new(
        "https://devnet-gateway.multiversx.com",
        &wallet
    );

    let deploy_data = DeployData {
        code: "<path to the .wasm file>",
        metadata: CodeMetadata::PAYABLE | CodeMetadata::UPGRADEABLE,
    };

    let result = PairContract::deploy(
        deploy_data,
        &mut executor,
        600_000_000, // gas limit
        &"WEGLD-d7c6bb".to_string(),
        &"USDC-8d4068".to_string(),
        &"<xexchange router address>".into(),
        &"<xexchange router owner address>".into(),
        &0, // total fee percent
        &0, // special fee percent
        &"<initial liquidity adder address>".into(),
        &vec![
            "<first admin address>".into(),
            "<second admin address>".into(),
        ]
    )
    .await
    .expect("Deployment failed.");

    println!("Deployment successful! Contract's address: {}", result.0.to_bech32_string().expect("Failed to convert address to bech32 format."));
}
The result yielded is a tuple. The first element captures the new address, and the second contains the transaction outcome.
And with that, you've successfully deployed a contract using NovaX!
Mocking with NovaX
NovaX equips developers with the capability to mock their environments seamlessly across queries, calls, and deployments. This feature is powered by the MultiversX's Rust Testing Framework. While this guide provides an overview of using the mocking capabilities, it won't delve into creating a ScenarioWorld. For that, kindly refer to the official documentation.
Before delving into the mocking process with NovaX, ensure you've added the necessary extension crate to your project. Update your Cargo.toml dependencies to include:
novax-mocking = "0.0.2"
Now, let's proceed with how to execute mocked queries, calls, and deploys using NovaX.
Note 1: The Rust Testing Framework mandates that you possess the code of every contract you interact with. These contracts should align with the same version of
mx-sdk-rsthat NovaX uses. Specifically, NovaX 0.0.22 is in sync withmx-sdk-rsversion 0.43.3.
Note 2: For those looking to replicate the real blockchain's state into a
ScenarioWorld, NovaX furnishes tools designed for this intricate process. We'll explore this technique further in the subsequent chapter.
Important: On the horizon for NovaX is the integration of the MultiversX Virtual Machine. This advancement will eliminate the dependency on contract codes, streamlining the process to require only the .wasm files.
Creating the Mocked Executor
If you've established a ScenarioWorld, spinning up a mocked executor is a straightforward process. Start by wrapping the ScenarioWorld instance within an Arc<Mutex<>> struct:
extern crate novax;
extern crate novax_mocking;
extern crate tokio;

use std::sync::Arc;
use tokio::sync::Mutex;
use novax::executor::StandardMockExecutor;
use novax_mocking::ScenarioWorld;

let world = ScenarioWorld::new();
// Adjust the world to match your requirements...

let executor = StandardMockExecutor::new(
    Arc::new(Mutex::new(world)),
    None // This represents the transaction sender. If set to None, it defaults to the contract address.
);
Executing Mocked Queries, Calls, and Deploys
With the mocked executor in place, you're now ready to send mocked queries, calls, and deployments. Just substitute your mocked executor in place of the regular one.
Mocked Query Example:
Here's how a previously introduced query would look when mocked:
extern crate novax;
extern crate novax_mocking;
extern crate tokio;

use novax::pair::pair::PairContract;
use std::sync::Arc;
use tokio::sync::Mutex;
use novax::executor::StandardMockExecutor;
use novax_mocking::ScenarioWorld;

#[tokio::main]
async fn main() {
    let world = ScenarioWorld::new();
    let executor = StandardMockExecutor::new(
        Arc::new(Mutex::new(world)),
        None // Represents the transaction sender. Defaults to contract address if None.
    );

    // Initializing the PairContract with its address
    let pair_contract = PairContract::new("erd1qqqqqqqqqqqqqpgqeel2kumf0r8ffyhth7pqdujjat9nx0862jpsg2pqaq");

    // Executing the query to obtain the first token's ID
    let result = pair_contract
        .query(executor)
        .get_first_token_id()
        .await
        .expect("Failed to fetch the token ID");

    println!("{}", result);
}
Mocked Call Example:
Similarly, calls can be mocked as shown below:
extern crate novax;
extern crate novax_mocking;
extern crate tokio;
extern crate num_bigint;
use num_bigint::BigUint;
use std::ops::Mul;
use novax::transaction::TokenTransfer;
use novax::pair::pair::PairContract;
use std::sync::Arc;
use tokio::sync::Mutex;
use novax::executor::StandardMockExecutor;
use novax_mocking::ScenarioWorld;

#[tokio::main]
async fn main() {
    let world = ScenarioWorld::new();
    let executor = StandardMockExecutor::new(
        Arc::new(Mutex::new(world)),
        None // Represents the transaction sender. Defaults to contract address if None.
    );

    let pair_contract = PairContract::new("erd1qqqqqqqqqqqqqpgqq67uv84ma3cekpa55l4l68ajzhq8qm3u0n4s20ecvx");

    let result_tokens = pair_contract
        .call(executor, 600_000_000) // gas limit, set to the maximum
        .with_esdt_transfers(&vec![
            TokenTransfer {
                identifier: "WEGLD-d7c6bb".to_string(),
                nonce: 0,
                amount: BigUint::from(10u8).pow(18) // 1 WEGLD
            }
        ])
        .swap_tokens_fixed_output(
            &"USDC-8d4068".to_string(), // token out
            &BigUint::from(10u8).pow(6).mul(24u8) // slippage, seeking at least 24 USDC
        )
        .await
        .expect("Failed to execute the swap.")
        .result
        .expect("No result from the swap.");

    println!(r#"
    Swap success! Received tokens:

    - {} of {},
    - {} of {}
    "#,
        result_tokens.0.amount,
        result_tokens.0.token_identifier,
        result_tokens.1.amount,
        result_tokens.1.token_identifier
    );
}
Mocked Deploy Example:
Here's how deployment operations can be mocked:
extern crate tokio;
extern crate novax;
extern crate novax_mocking;

use novax::pair::pair::PairContract;
use novax::executor::NetworkExecutor;
use novax::CodeMetadata;
use novax::code::DeployData;
use std::sync::Arc;
use tokio::sync::Mutex;
use novax::executor::StandardMockExecutor;
use novax_mocking::ScenarioWorld;

#[tokio::main]
async fn main() {
    let world = ScenarioWorld::new();
    let mut executor = StandardMockExecutor::new(
        Arc::new(Mutex::new(world)),
        Some("<deployer address>".into()) // The transaction sender, mandatory when deploying a contract
    );

    let deploy_data = DeployData {
        code: "<path to the .wasm file>",
        metadata: CodeMetadata::PAYABLE | CodeMetadata::UPGRADEABLE,
    };

    let result = PairContract::deploy(
        deploy_data,
        &mut executor,
        600_000_000, // gas limit
        &"WEGLD-d7c6bb".to_string(),
        &"USDC-8d4068".to_string(),
        &"<xexchange router address>".into(),
        &"<xexchange router owner address>".into(),
        &0, // total fee percent
        &0, // special fee percent
        &"<initial liquidity adder address>".into(),
        &vec![
            "<first admin address>".into(),
            "<second admin address>".into(),
        ]
    )
    .await
    .expect("Deployment failed.");
}
Equipped with this knowledge, you're now ready to craft well-tested backends! In the upcoming chapter, we'll dive into how NovaX can be instrumental in constructing tests that harness data from the real environment.
Cloning Blockchain Data for Precision Mocking with NovaX
NovaX empowers developers with the ability to precisely replicate blockchain data, allowing them to craft an almost real-world mocking environment. This process encompasses:
- Retrieving contract storage data.
- Fetching balances associated with specific addresses.
- Procuring contract codes (a feature set to shine when NovaX completes integration with the MultiversX Virtual Machine).
⚠️ Caution: Cloning data from multiple addresses can be bandwidth-intensive. It's a best practice to utilize your own gateway by configuring your own Observing Squad for this purpose.
Fetching Data
Start by directing NovaX to the specific addresses you wish to clone:
extern crate tokio;
extern crate novax;
extern crate novax_mocking;

use novax_mocking::world::infos::ScenarioWorldInfos;

#[tokio::main]
async fn main() {
    let infos = ScenarioWorldInfos::fetch(
        "https://gateway.multiversx.com",
        &vec![
            "erd1qqqqqqqqqqqqqpgqq67uv84ma3cekpa55l4l68ajzhq8qm3u0n4s20ecvx".into(),
            "erd1qqqqqqqqqqqqqpgquu5rsa4ee6l4azz6vdu4hjp8z4p6tt8m0n4suht3dy".into(),
            "erd1932eft30w753xyvme8d49qejgkjc09n5e49w4mwdjtm0neld797su0dlxp".into(),
            // ... add more addresses as needed
        ]
    ).await;
}
Constructing the World
Using the ScenarioWorldInfos, generate a ScenarioWorld. Remember, you must still define contract codes (unless NovaX integrates the MultiversX Virtual Machine):
extern crate tokio;
extern crate novax;
extern crate novax_mocking;

use std::sync::Arc;
use tokio::sync::Mutex;
use novax::Address;
use novax::executor::StandardMockExecutor;
use novax_mocking::ScenarioWorld;

use novax_mocking::world::infos::ScenarioWorldInfos;

#[tokio::main]
async fn main() {
    let infos = ScenarioWorldInfos::fetch(
        "https://gateway.multiversx.com",
        &vec![
            "erd1qqqqqqqqqqqqqpgqq67uv84ma3cekpa55l4l68ajzhq8qm3u0n4s20ecvx".into(),
            "erd1qqqqqqqqqqqqqpgquu5rsa4ee6l4azz6vdu4hjp8z4p6tt8m0n4suht3dy".into(),
            "erd1932eft30w753xyvme8d49qejgkjc09n5e49w4mwdjtm0neld797su0dlxp".into(),
            // ... add more addresses as needed
        ]
    ).await;

    let world = infos.into_world(|address, code_expr, world| {
        let wegld_usdc_pair: Address = "erd1qqqqqqqqqqqqqpgqq67uv84ma3cekpa55l4l68ajzhq8qm3u0n4s20ecvx".into();
        let wegld_mex_pair: Address = "erd1qqqqqqqqqqqqqpgquu5rsa4ee6l4azz6vdu4hjp8z4p6tt8m0n4suht3dy".into();

        if address == wegld_usdc_pair.to_bytes() || address == wegld_mex_pair.to_bytes() {
            // register the contract here, it looks like the below comment:
            // world.register_contract(code_expr, pair::ContractBuilder)
        }
    });

    let executor = StandardMockExecutor::new(Arc::new(Mutex::new(world)), None);
    // You're now set up to perform mocked queries, calls, and deploys
}
(Optional) Saving Data to a File
Given that cloning can be network-intensive and blockchain states are ever-evolving, it's beneficial to store your cloned data into a file:
extern crate tokio;
extern crate novax;
extern crate novax_mocking;

use novax::Address;

use novax_mocking::world::infos::ScenarioWorldInfos;

#[tokio::main]
async fn main() {
    let infos = ScenarioWorldInfos::fetch(
        "https://gateway.multiversx.com",
        &vec![
            "erd1qqqqqqqqqqqqqpgqq67uv84ma3cekpa55l4l68ajzhq8qm3u0n4s20ecvx".into(),
            "erd1qqqqqqqqqqqqqpgquu5rsa4ee6l4azz6vdu4hjp8z4p6tt8m0n4suht3dy".into(),
            "erd1932eft30w753xyvme8d49qejgkjc09n5e49w4mwdjtm0neld797su0dlxp".into(),
            // ... add more addresses as needed
        ]
    ).await;

    infos.save_into_file("clone.json");
}
Later, you can load this data as needed:
extern crate tokio;
extern crate novax;
extern crate novax_mocking;


use novax_mocking::world::infos::ScenarioWorldInfos;

#[tokio::main]
async fn main() {
let infos = ScenarioWorldInfos::from_file("clone.json").unwrap();
// Proceed with other operations
}
That's it! With this sophisticated technique, you're poised to create exceptionally accurate backend tests.